Gather Content for Websites: The Content Collection Way

Creating a strong website doesn’t start in a CMS. It starts with collecting the right content in a way that avoids bottlenecks, keeps projects moving, and delivers quality.
In this post, you’ll learn how to run content collection like a pro. Think of it as a playbook—not theory, but practical moves you can use right away. If you’ve ever been stuck chasing files, waiting on approvals, or rewriting content at the last minute, this guide is for you.
What is Content Collection?
Content Collection is the process of gathering, organizing, and preparing the text, images, videos, and assets you need for your website. Instead of scattered emails and lost files, everything is centralized, easy to review, and ready to use.
Definition: Content Collection is about capturing information from conversations, files, and media, then shaping it into usable website content.
Content Collection Is Not...
Content Collection is not the same as planning a sitemap or building page layouts. While a sitemap may be shaped by the pieces of content you collect, collection itself comes first. It is the act of gathering text, visuals, files, and inputs into one place before any planning or structuring happens. Without this step, site planning relies on placeholders and assumptions rather than real material.
Why Efficient Collection Matters
A good content collection process surfaces the latest version across channels so you stop chasing and start creating. Without a clear process, content gathering quickly becomes the biggest bottleneck in web projects. Clear, relevant, and up-to-date content builds trust and drives higher conversions on the site. Centralizing content keeps work moving forward and everyone aligned.
A Content Collection workflow helps you:
- Avoid: Missing files, unclear approvals, and scattered notes slow everything down.
- Keep projects moving: Projects stall when content is trapped in inboxes or stuck waiting on updates.
- Quality: When inputs are complete and organized, outputs are stronger.
Prepare Before You Collect
Relevant content doesn’t appear by accident. You need a simple, repeatable system to gather it. Take time up front to plan what you’ll need and how you’ll collect it before the project begins.
Step 1: Define what you need
Start with a clear list of content types: text, images, video, documents, testimonials, quotes, or data. Tie each item to its purpose — homepage copy, blog post, product detail, or FAQ. Before you start collecting, map out the types of content your project requires. This becomes your “content menu.”
Types of Content to Collect
Core Website Content
- Page copy (home, about, services, contact, etc.)
- Headlines and subheadings
- Calls to action (buttons, banners)
Visual Assets
- Logos (primary, secondary, favicon)
- Photos (team, product, environment, stock)
- Graphics or illustrations
- Videos (introductions, demos, testimonials)
Support Materials
- Downloadable files (PDFs, brochures, whitepapers)
- Forms (applications, contact, surveys)
- Tables or data sets
- Presentations or slide decks
SEO + Metadata
- Meta titles and descriptions
- Alt text for images
- Keywords or key phrases
- URL structure guidelines
Voice-of-Customer Inputs
- Testimonials and reviews
- Case studies
- FAQs from support or sales teams
- Quotes from leadership or clients
Governance + Guidelines
- Brand style guide (fonts, colors, tone of voice)
- Accessibility requirements (contrast, captions, formatting)
- Compliance needs (legal disclaimers, privacy text, terms of service)
Step 2: Create a central hub
Once you have defined the types of content you need, the next move is to decide where all of it will live. This is your hub, the single source of truth that holds every draft, file, and note in one place. Without it, content gets lost in inboxes, Slack threads, and personal desktops which creates bottlenecks that slow down the entire project.
Your hub does not need to be complex. For larger projects, a dedicated content collection tool or project management system may be a better fit. The key is consistency. Everyone knows where to put content and where to find it.
Think of the hub as the foundation you build on before you ever create a sitemap. If you skip this step, you end up mapping out pages before you know what content exists, which leads to blank sections, placeholders, and rushed edits. By centralizing content first, your sitemap becomes a reflection of real material rather than assumptions.
Pro tip: Set simple rules for file naming and versioning in your hub. This prevents duplicate uploads and makes it clear which version is the one to use.
Step 3: Set clear requests
Provide checklists or briefs so contributors know exactly what to submit and in what format. Spell out word counts, file types, naming conventions, and deadlines to avoid confusion.
Do not assume people know what to deliver. The fastest way to derail a project is with vague requests. Every contributor should understand exactly what is needed, when it is due, and how it should be delivered. Give them a simple brief or checklist that outlines the details up front.
Spell out requirements such as word counts, file types, image sizes, and naming rules. For example, a blog author might need to provide a 600-word draft in a Word document, while a designer is expected to submit a 1200-pixel JPG with a transparent background. When these details are clear, you save hours of back and forth.
Deadlines are part of the request too. Assign realistic dates for every piece of content and explain what happens if it slips. A missed deadline for a single photo can hold up an entire page build. When contributors know expectations in advance, they are more likely to deliver on time.
Pro tip: Create standard request templates you can reuse for common content types such as bios, case studies, and FAQs. Templates speed up the process and reduce confusion across projects.
Brand Manual
A brand manual defines the rules of your brand so that every writer, designer, or developer knows how to present it. Without one, you risk inconsistent visuals and mixed messaging that confuse your audience. When a brand manual is collected early in the process, it becomes the reference point for all content.
A strong brand manual usually includes:
- Logo guidelines: approved versions, size limits, and where each version should be used
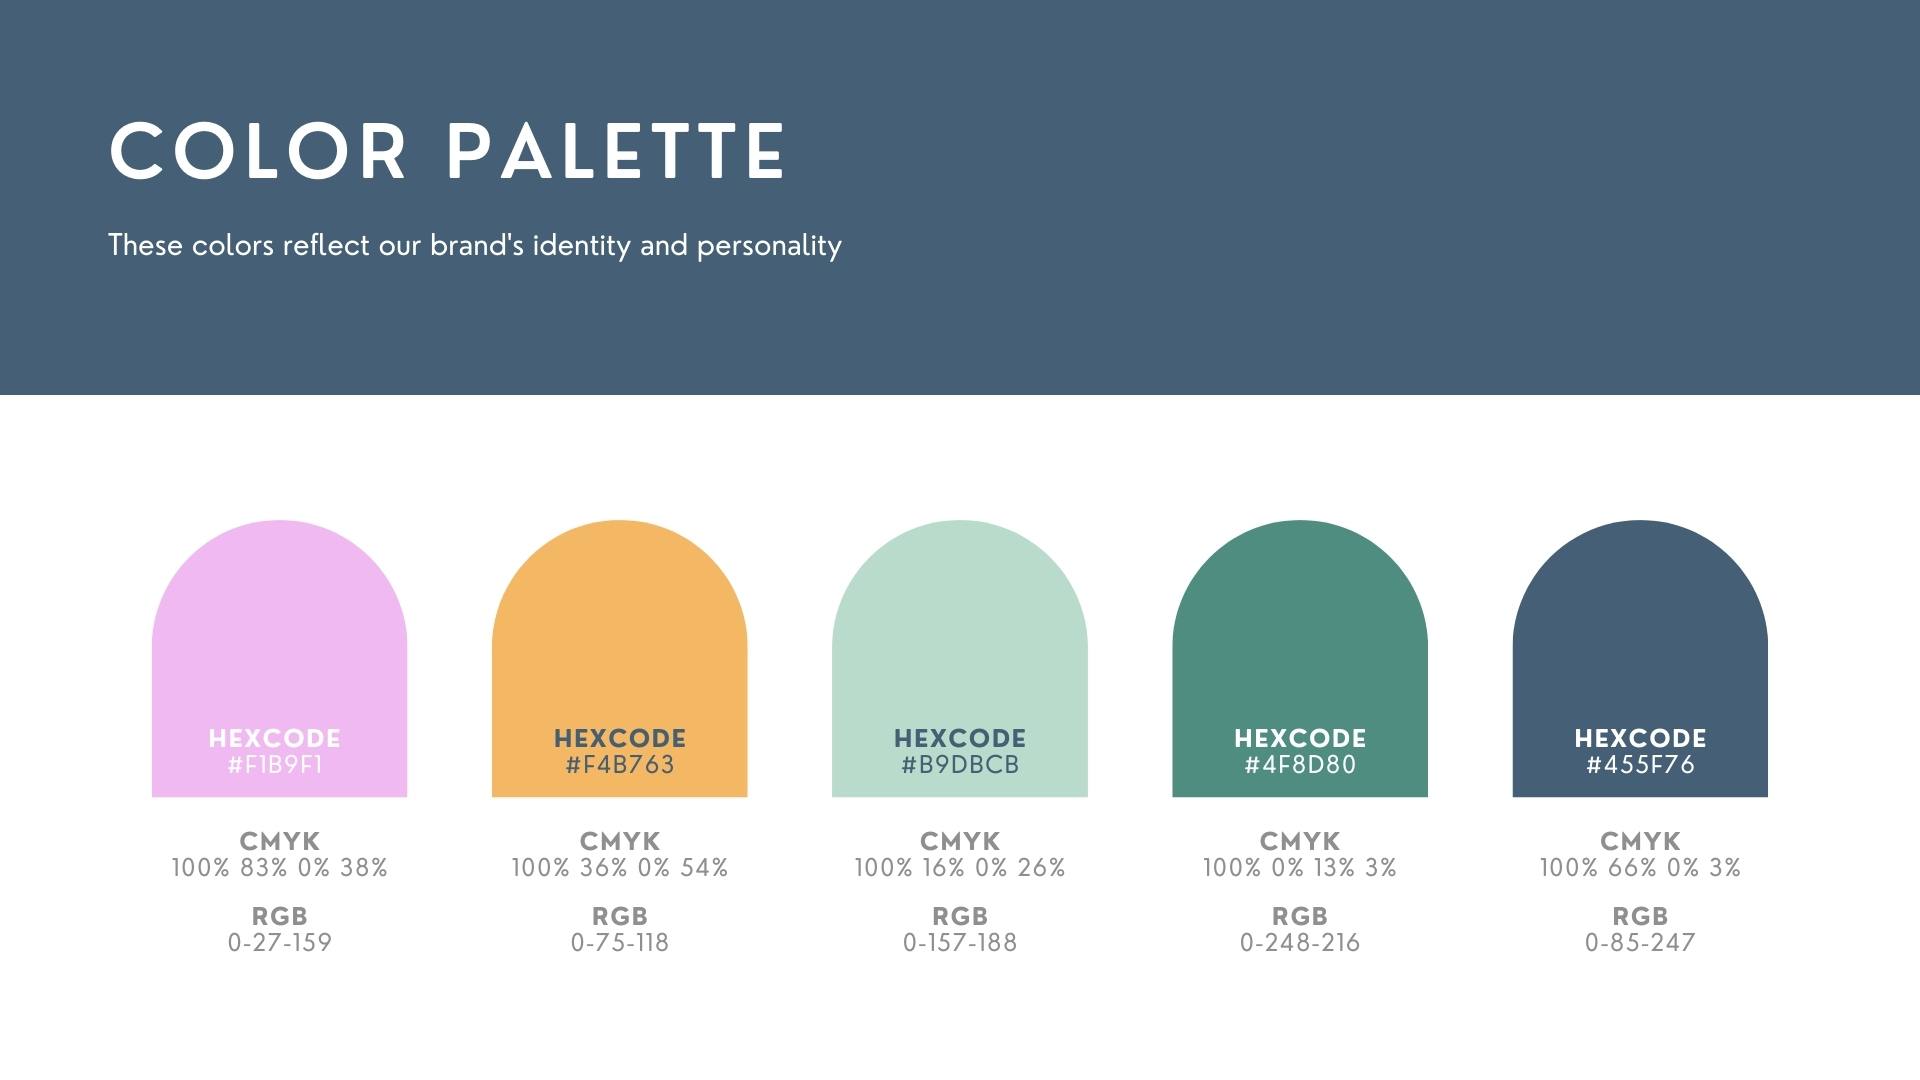
- Color palette: primary and secondary colors with HEX, RGB, and CMYK codes
- Tone of voice: examples of how the brand should sound in writing
- Do’s and don’ts: common mistakes to avoid when applying brand assets
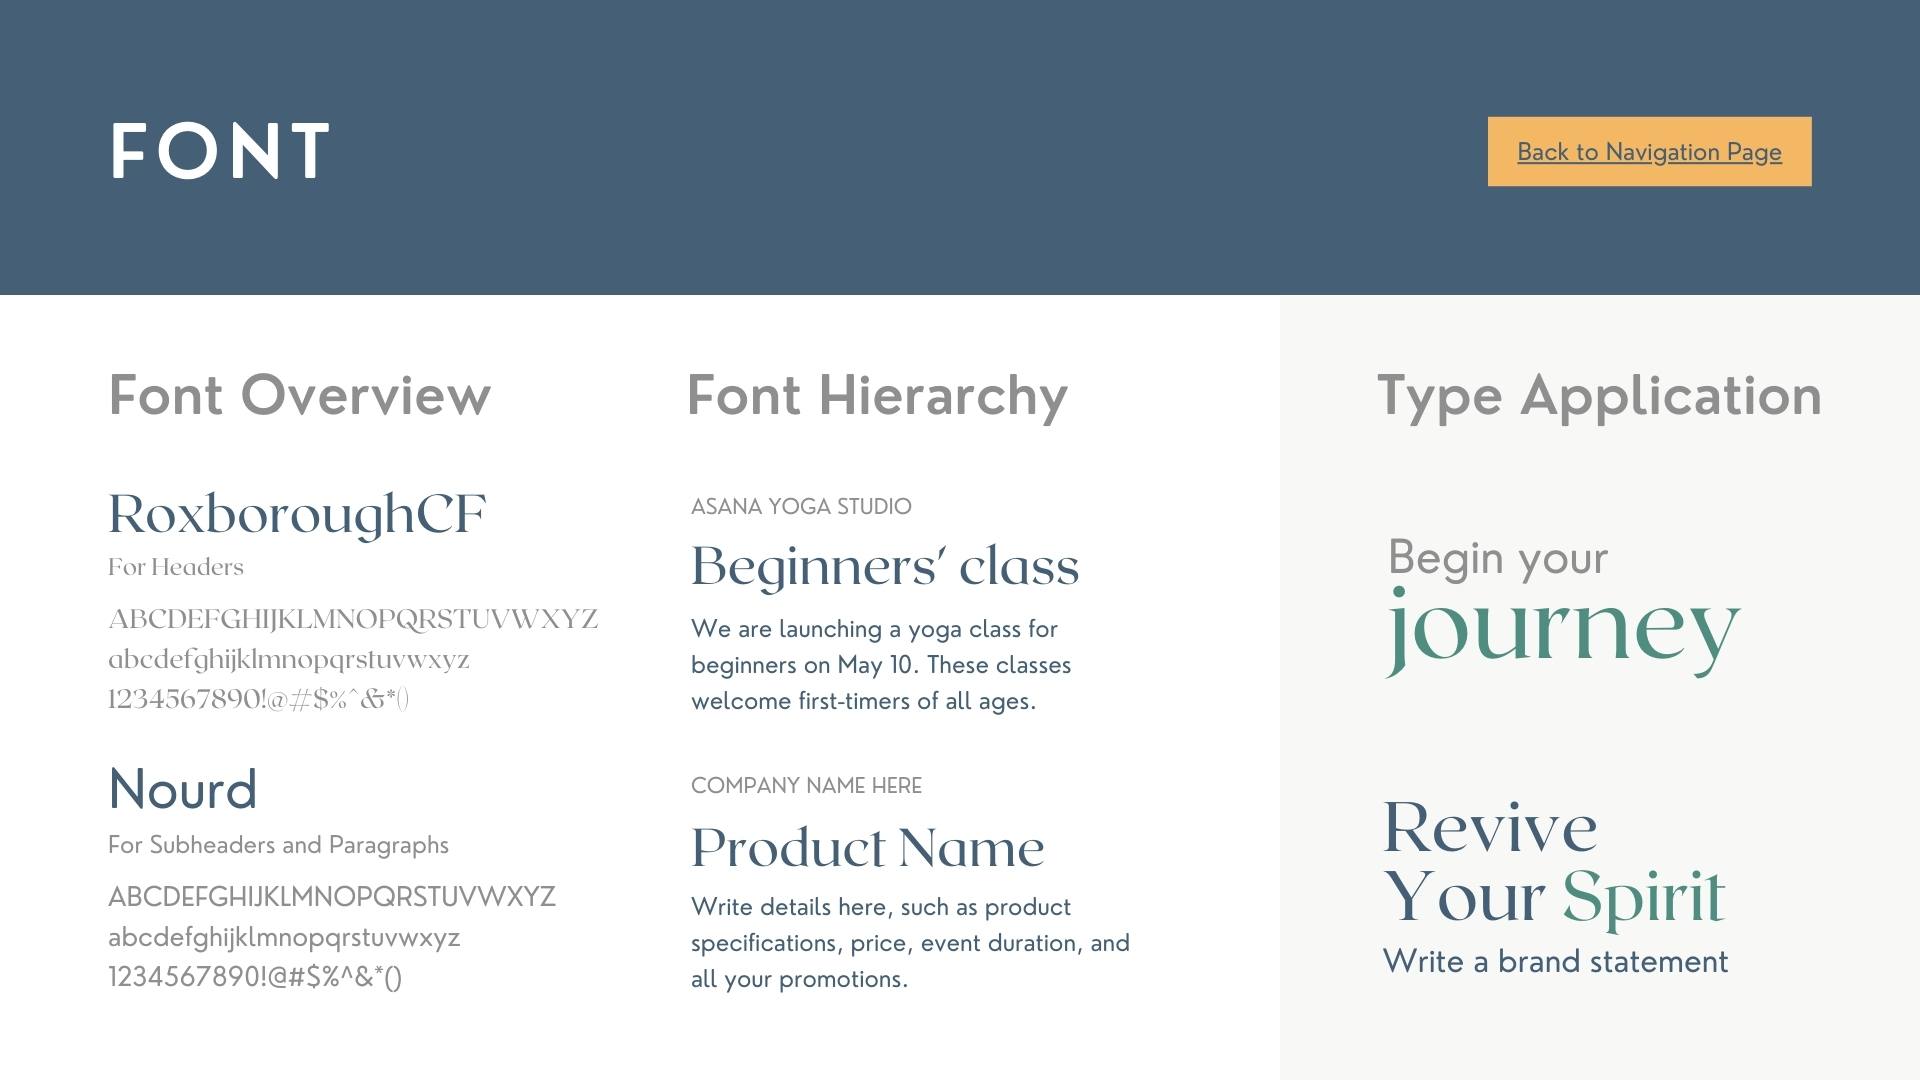
- Typography: font families, weights, and sizes for headings, body, and captions
- Imagery style: rules for photography, illustrations, and icons
Step 4: Capture from conversations
Do not wait for polished drafts. Many of the best content ideas come straight from everyday conversations. Support tickets, sales calls, and customer emails are goldmines for content that your audience actually cares about. FAQs often come directly from these sources.
Here are a few common examples of turning conversations into usable content:
Support Emails
A customer asks, “How do I reset my password?” That becomes inbox to Knowledge' Workflow: Turning Emails Into Structured Knowledge, FAQ article, or Blog Post.
Sales Calls
A prospect asks, “Can your software integrate with Salesforce?” Capture that as a product FAQ and a blog post about integrations.
Community Threads
Multiple users on Slack or Discord ask, “What’s the difference between your free and paid plans?” That can fuel a pricing comparison page.
Internal Questions
A teammate keeps asking, “Where do we find the brand logos?” That becomes part of your shared resource hub.
By capturing these snippets as they appear, you build a living FAQ that reflects what people are really asking. Instead of guessing what content will help, you are documenting actual customer needs and turning them into clear, reusable answers.
- Organize as you collect: Tag or categorize content as it arrives, by topic, audience, or stage. A little organization up front saves hours later when you need to find something fast.
- Collect context, not just files: Record where each piece came from, who owns it, and how it can be used. A file without context causes rework and slows approval.
Step 5: Make approvals visible
Label content as draft, in review, or approved. Clear status keeps the team aligned and prevents publishing the wrong version.
Step 6: Encourage reusable pieces
Do not think of content as single-use. The best teams stretch every asset by reusing it across multiple formats and channels. When you collect content, flag anything that could serve more than one purpose. This mindset saves time, reduces cost, and ensures your message is consistent wherever people encounter it.
Examples of reusable pieces include:
- Customer quotes: A single line from an interview can appear in a case study, landing page, and be posted to social.
- Statistics: A data point can strengthen a blog post, slide in a presentation, or become an infographic..
- FAQs: A question captured from support can be turned into a help article.
- Visual assets: A product photo can be used on the website, cropped for ads, and repurposed in a customer newsletter.
By encouraging reuse, you avoid reinventing the wheel and make every piece of content work harder. This approach not only saves production time but also creates a consistent story across touchpoints.
Pro tip: Add a simple tag like “reusable” or “multi-channel” in your content hub so contributors and editors can spot opportunities quickly.
Step 7: Close gaps early
As you review, flag what is missing. It is easier to chase a missing photo or testimonial mid project than one day before launch.
With this list defined early, your team knows exactly what to gather and you avoid late surprises like “we still need bios” or “where’s the logo in the right format?”
New vs. Active Websites
For new sites, gather core content before design begins. The message leads, design follows. For active sites, create an ongoing collection workflow so updates, blog posts, and campaigns don’t stall out. Both approaches save time and reduce stress.
Tools That Help
You don’t need dozens of apps. Keep it simple with a mix of storage, project management, and communication tools. A Content Collection platform ties it all together and makes reuse easier.
- Shared storage for files and media
- Project boards for deadlines and task tracking
- Messaging apps for quick capture of conversations
- Content Collection spaces for organizing and reusing content
Why Content Collection is Different
Most CMS platforms help you publish. Content Collection helps you prepare. It’s the missing upstream process — capturing from real conversations and turning fragments into organized, ready-to-publish website content.